Here are the best ways to transfer your photos from iPhone to Mac
Want to get your amazing iPhone photos on your Mac for editing (or anything else)? Here are the best ways to do just that!
If you have the best iPhone, then you probably use it to take photos — a lot of them. After all, they always say that the best camera is the one with you, and who leaves their iPhone behind? And you may want to use your iPhone or even your Mac to edit your photos so that they look perfect, right? But how do you get your photos from your iPhone over to your Mac? Well, there are a few methods of how to transfer photos from your iPhone to your Mac, so let’s dive in.
And don’t forget that you can transfer photos from your Mac to your iPhone as well.
Use iCloud Photo Library
One of the easiest methods to transfer photos from your iPhone to your Mac, with no cables required, is to turn on iCloud Photos. When this is enabled, you should be able to access all of the photos and videos that you have across all of your devices — including the best iPad, iPhone, and Mac.
However, you will need to have enough storage space in your iCloud account, which you may not have. Apple provides 5GB of free space for every iCloud account, which is like nothing these days. If you want to use iCloud Photos, you may need to consider which iCloud storage plan you should get, which start at $0.99 a month for 50GB, $2.99 for 200GB, or you can get 2TB for $9.99 a month. There are also Apple One bundles, which get you iCloud storage on top of other Apple services like Apple Arcade, Apple News+, Apple Fitness, and more.
The 2TB option can also be shared with up to six others through Family Sharing. For most individuals, the 200GB should suffice. However, you should keep in mind that this iCloud storage is not just for iCloud Photos — it’s for everything you store in iCloud, including iCloud backups, which can take up quite a bit of space.
To use iCloud Photos for importing your photos over to your Mac from your iPhone, you’ll first need to make sure that all of your devices have iCloud Photos enabled.
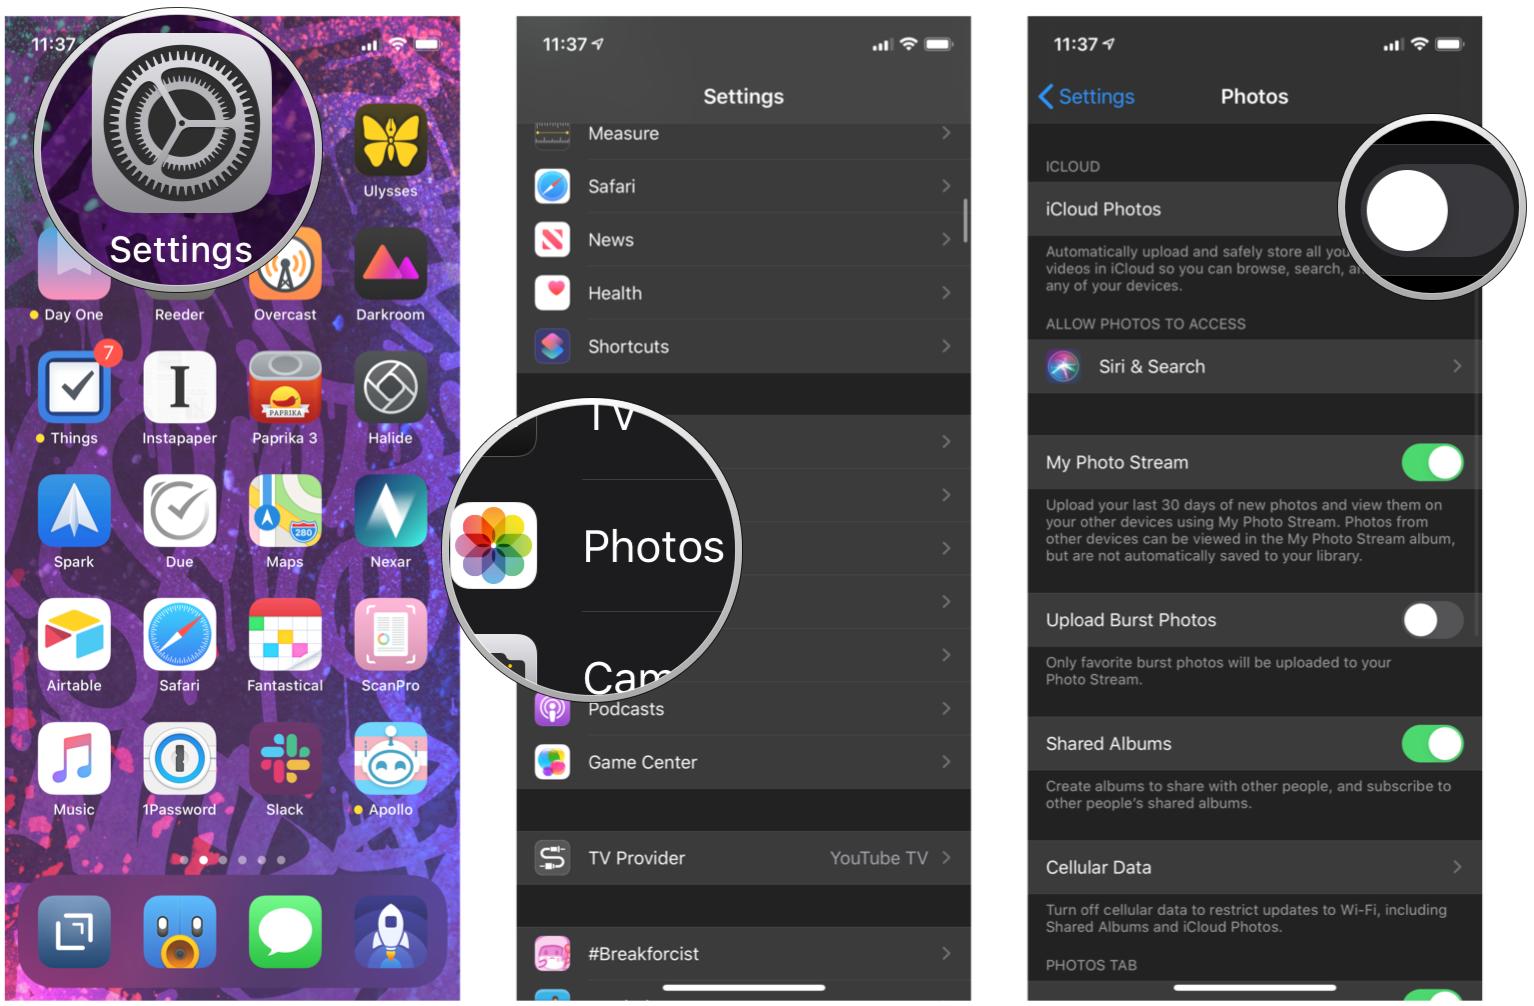
Turn on iCloud Photos on your iPhone or iPad
- Launch Settings on your iPhone or iPad.
- Scroll down and tap on Photos.
-
Tap the toggle for iCloud Photos to ON (green).
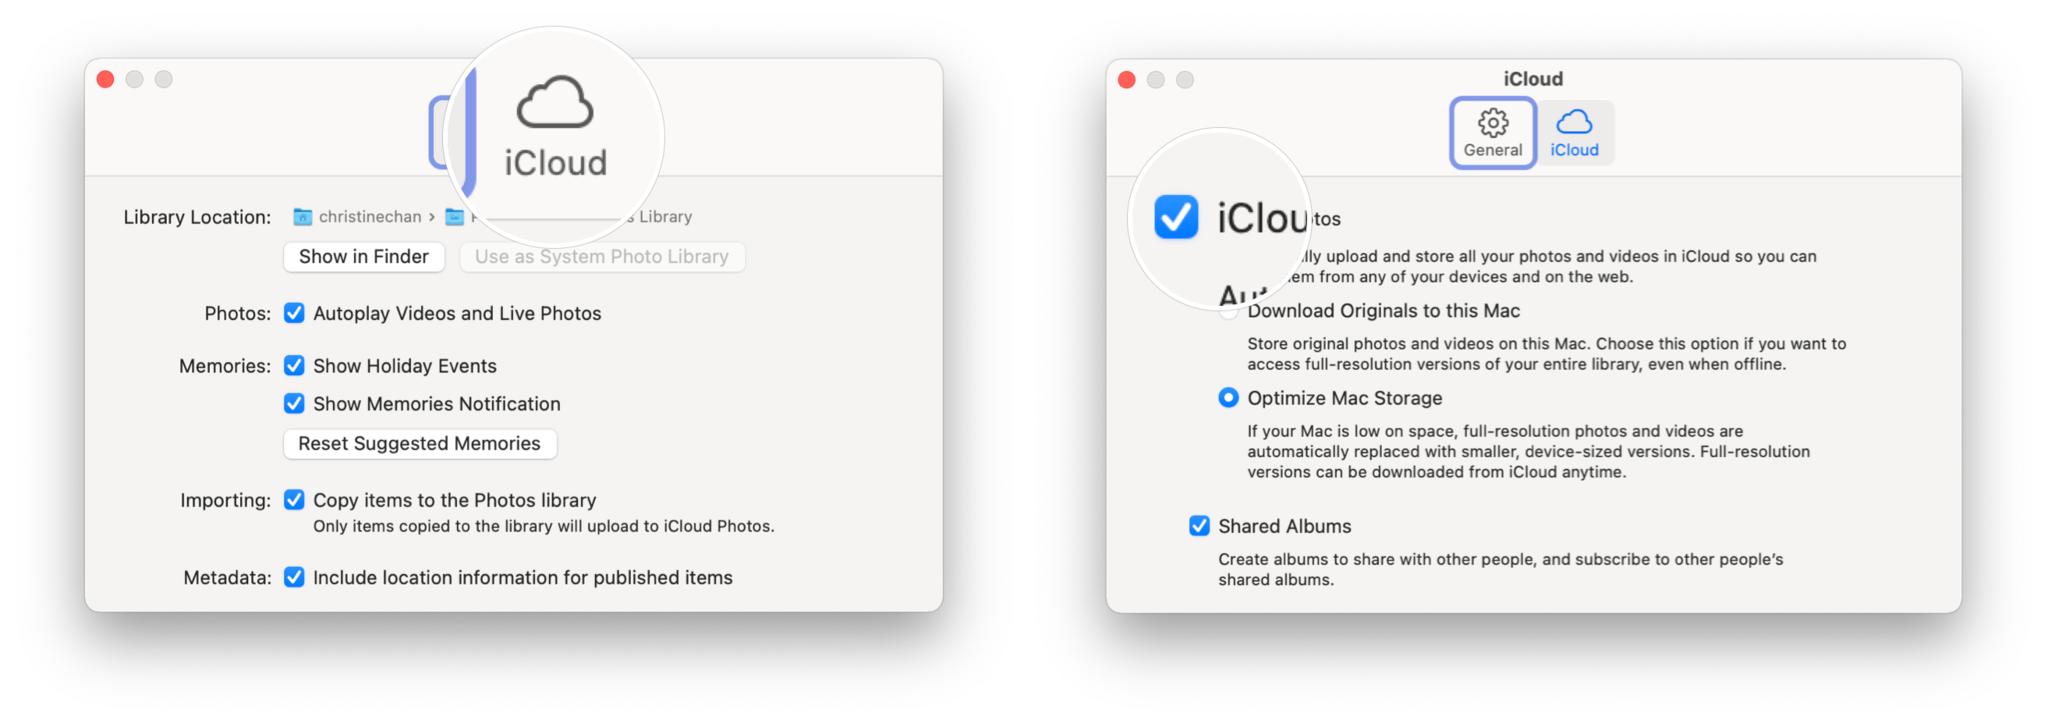
Turn on iCloud Photos in the Photos app on your Mac
- Launch the Photos app on your Mac.
- Click Photos in the upper left corner of the menu bar.
- Click Preferences (you can also easily access the Preferences by pressing cmd and , on your keyboard).
- Click on the iCloud tab.
-
Click the checkbox on iCloud Photos to turn it on.
Once iCloud Photos is enabled on all of the devices you want to use it on, your images should sync automatically across everything. However, it may take up to 24 hours after turning it on for everything to get synced over, so you’ll have to be patient. After that, though, everything should be rather seamless when it comes down to how to transfer photos from your iPhone to your Mac.
Import via the Photos app on Mac
If you use the Photos app on your Mac to manage your photos and edit them, but you don’t want to use iCloud Photos, then you’ll need to manually plug your phone in and import it the old fashioned way. Here’s how.
- Connect your iPhone or iPad to your Mac via a USB cable.
- Open the Photos app on your Mac.
- The Photos app should automatically be on the Import screen with all photos and videos on the connected device. If not, just click on the device name in the sidebar.
- Select the photos you want to import.
-
Click Import Selected. If you did not select photos, click Import All New Photos.
- Photos app will begin the process. Once it’s completed, you can disconnect your iPhone or iPad from your Mac.
Before iCloud Photos was a thing, this was probably the best and most straightforward way on how to transfer photos from your iPhone to your Mac.
Transfer the photos with AirDrop
Don’t use the Photos app on Mac? No problem. Another quick way on how to transfer photos from your iPhone to your Mac is to utilize AirDrop. With AirDrop, you’re using Bluetooth Low Energy to basically create a point-to-point WiFi network that can transfer data between two Apple devices, such as an iPhone and a Mac, an iPhone to another iPhone, an iPhone to an iPad — you get the idea. AirDrop is fast, power-efficient, and secure.
It’s also incredibly easy to use!
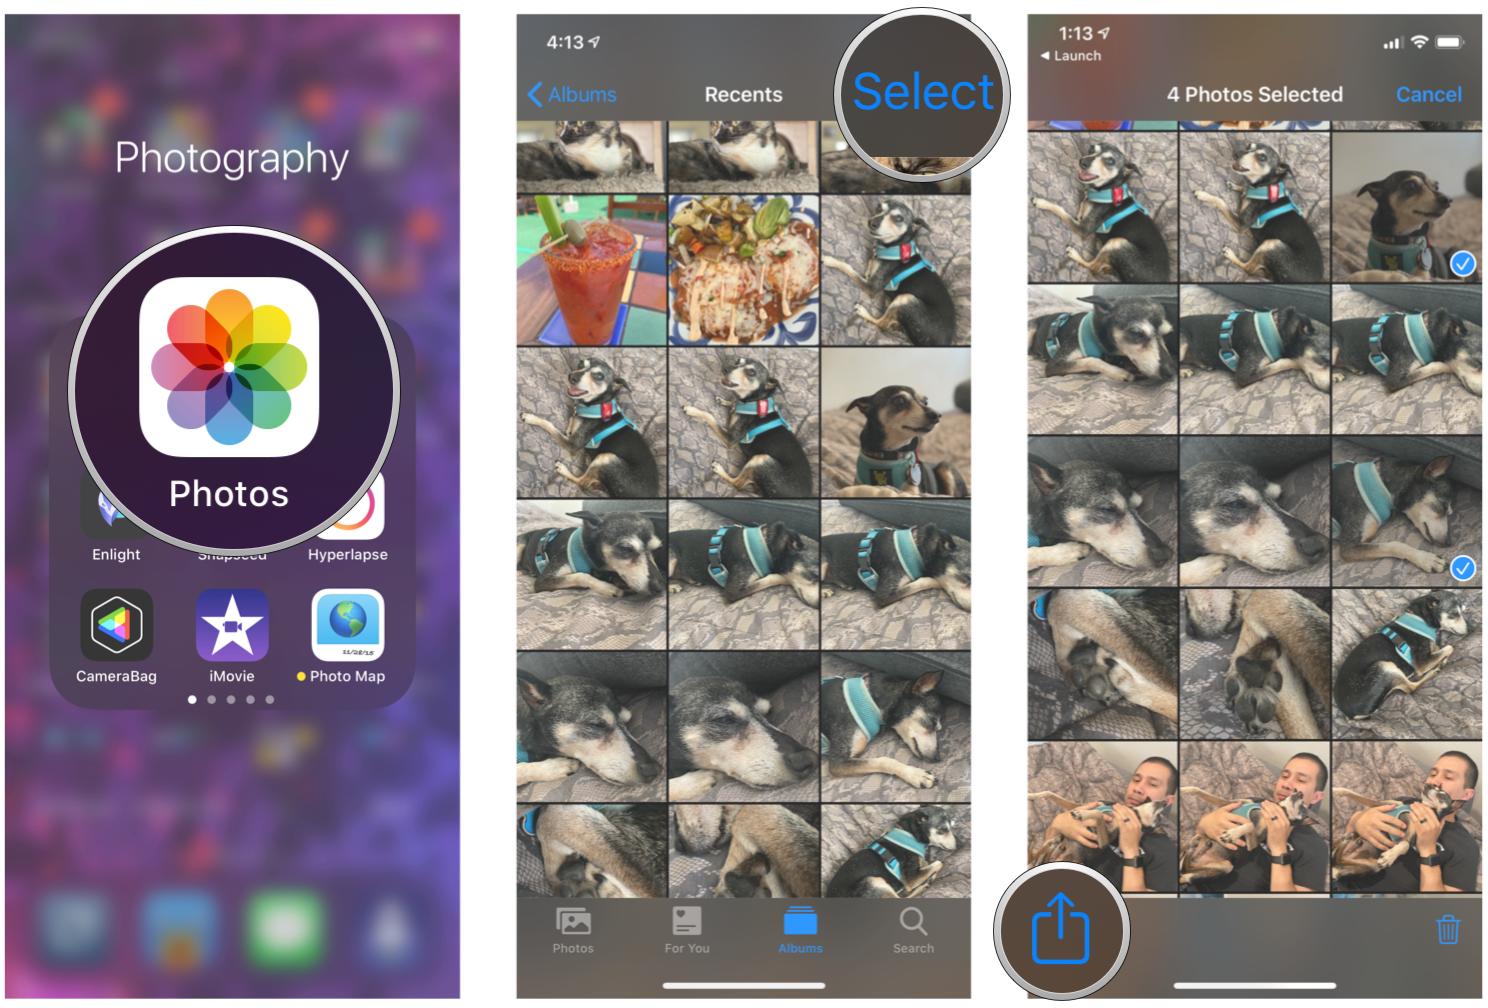
- Launch Photos on your iPhone or iPad.
- Find the photos and videos that you want to send to your Mac. You can do it for individual images or a batch of multiple photos.
-
Tap the Share button in the bottom right corner.
- Tap AirDrop.
-
Select the Mac device that you want to send the images to.
- On your Mac, the AirDropped image should appear in a Finder window.
If you use AirDrop enough, it will begin to show up as the first choice in the top row of sharing options. You can just tap it to send to your most frequently AirDropped device, which may be your Mac.
I honestly use AirDrop every day to complete work here at iMore. It’s the fastest way to for me to get iPhone and iPad screenshots, product review photos, and more, without having to deal with iCloud Photos or the Photos app on Mac.
Utilize the Files app
If you want to transfer photos from your iPhone to your Mac, but don’t want to use iCloud Photos and Photos on Mac, then you could use the Files app instead. Importing a file into the Files app on your iPhone means you can access that photo or video file from your Mac via iCloud Drive, or even another third-party syncing service, such as Dropbox or Google Drive.
How to add a third-party syncing service to the Files app
If you prefer to use a third-party service, such as Dropbox, you’ll need to turn that on first.
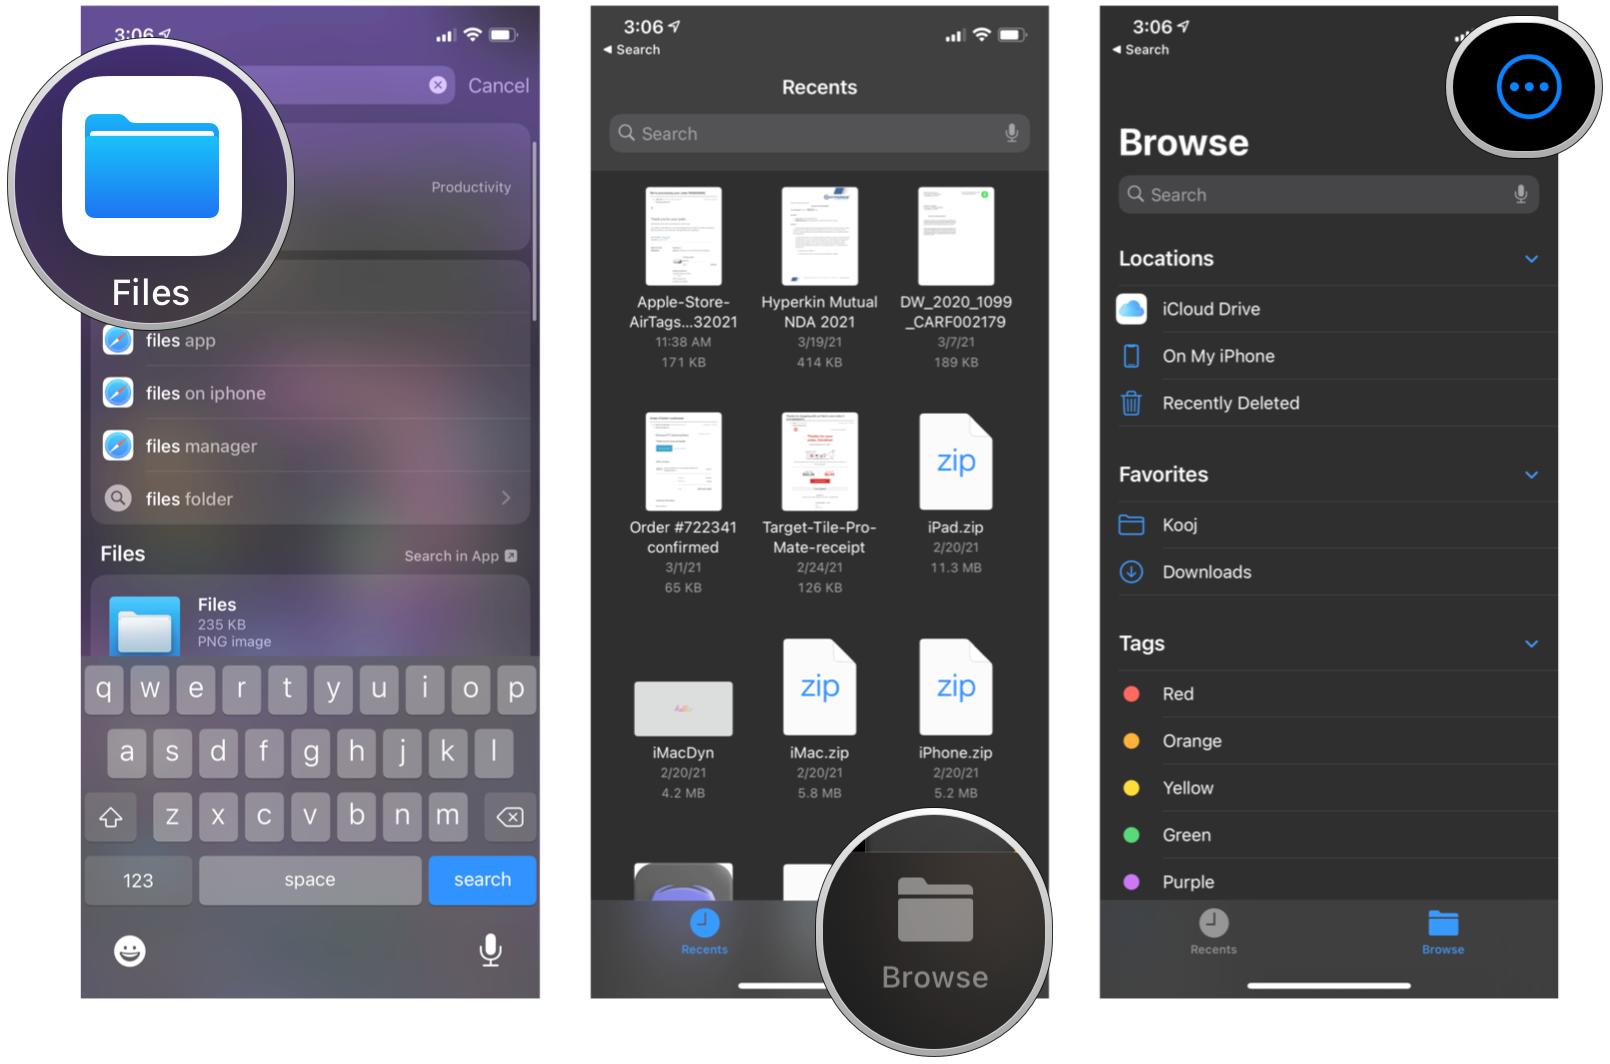
- Launch the Files app on your iPhone or iPad.
- Tap on the Browse tab.
-
Tap the “…” button in the upper right corner.
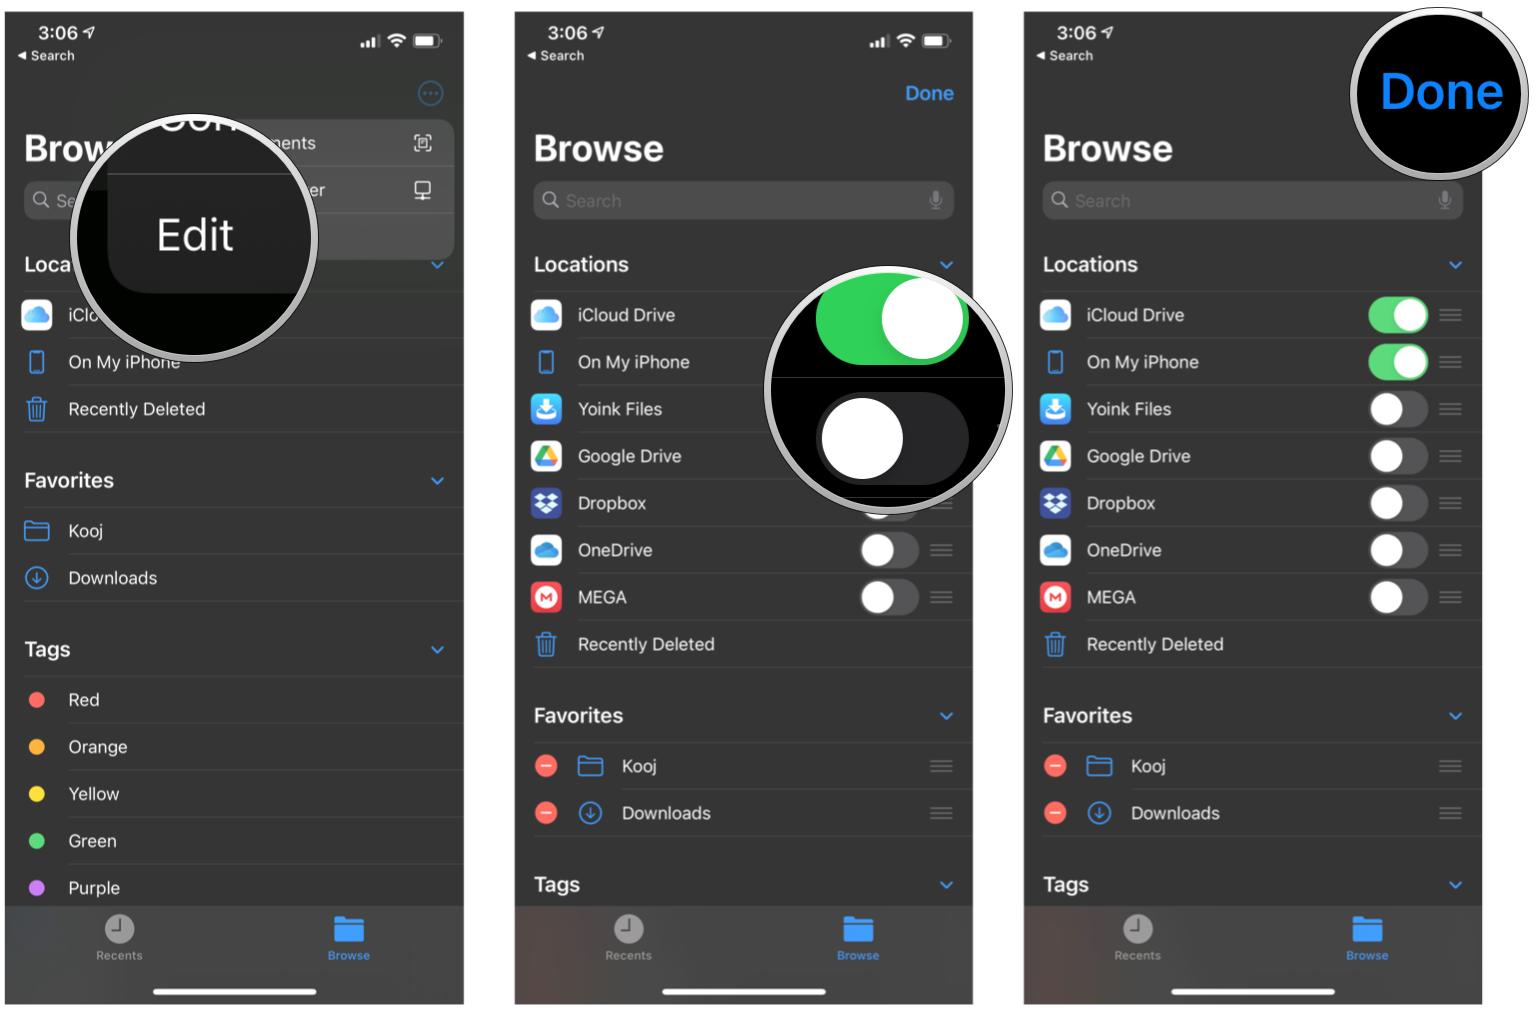
- Tap Edit.
- Under Locations, tap the toggle for the third-party service or app you want to enable.
-
Tap Done.
Now that your service or app is enabled in the Files app, you should be able to browse all of your stored files directly, without having to use a separate app.
Of course, third-party services like Dropbox also have standalone apps that can handle your Camera Roll uploads automatically as well.
How to send a photo or video to the Files app
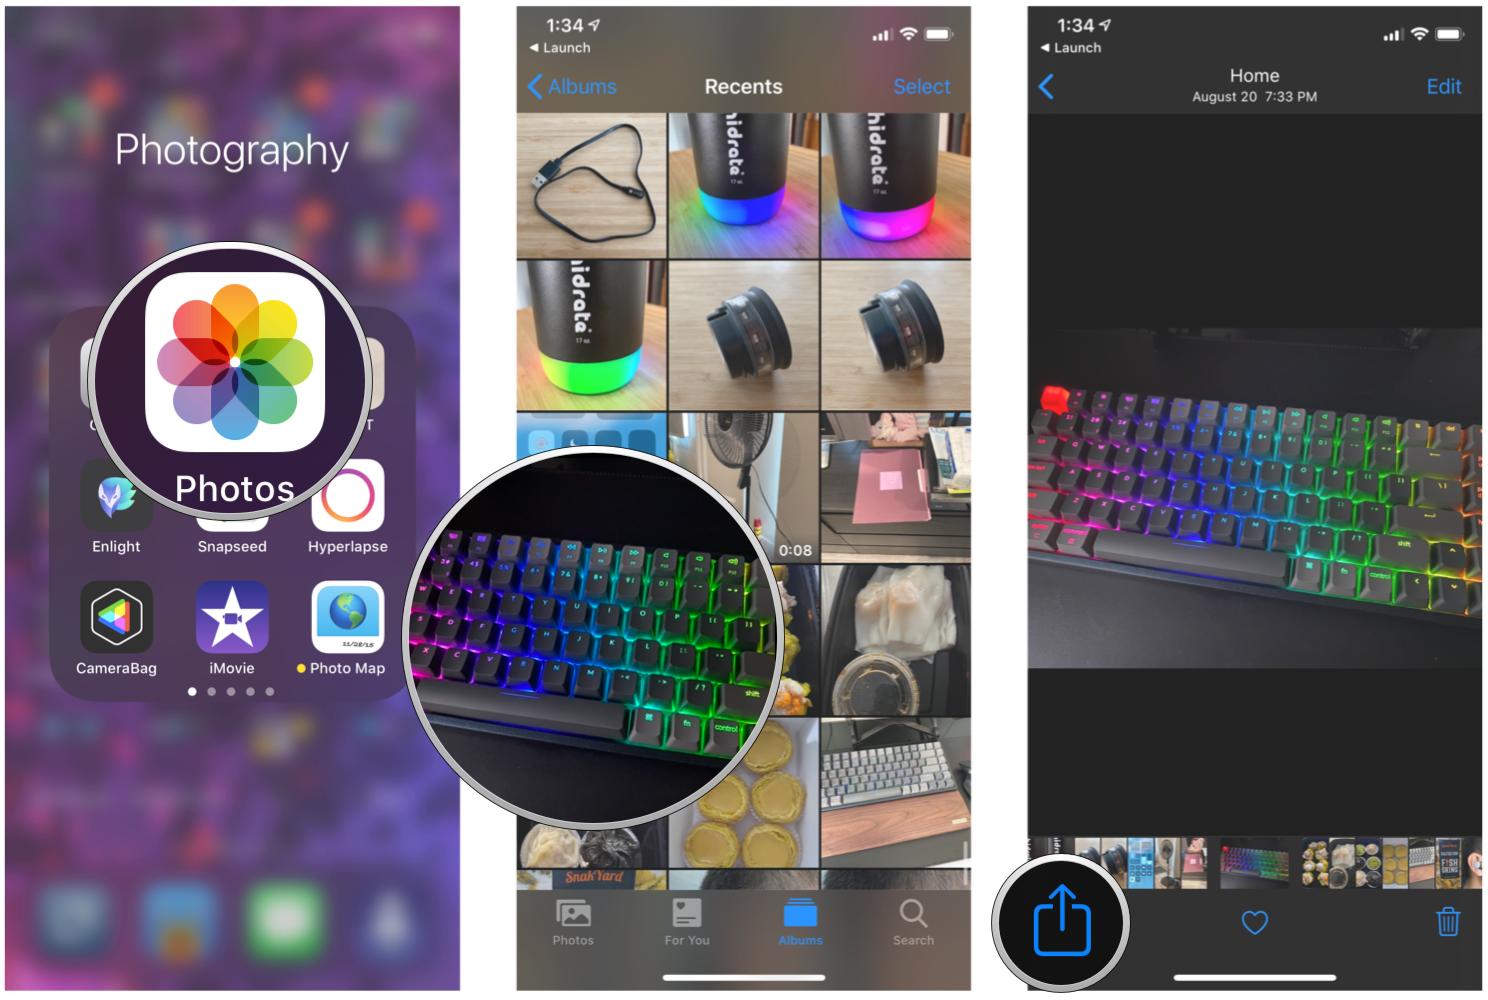
- Launch Photos on your iPhone or iPad.
- Find the photos and videos that you want to send to Files.
-
Tap the Share button.
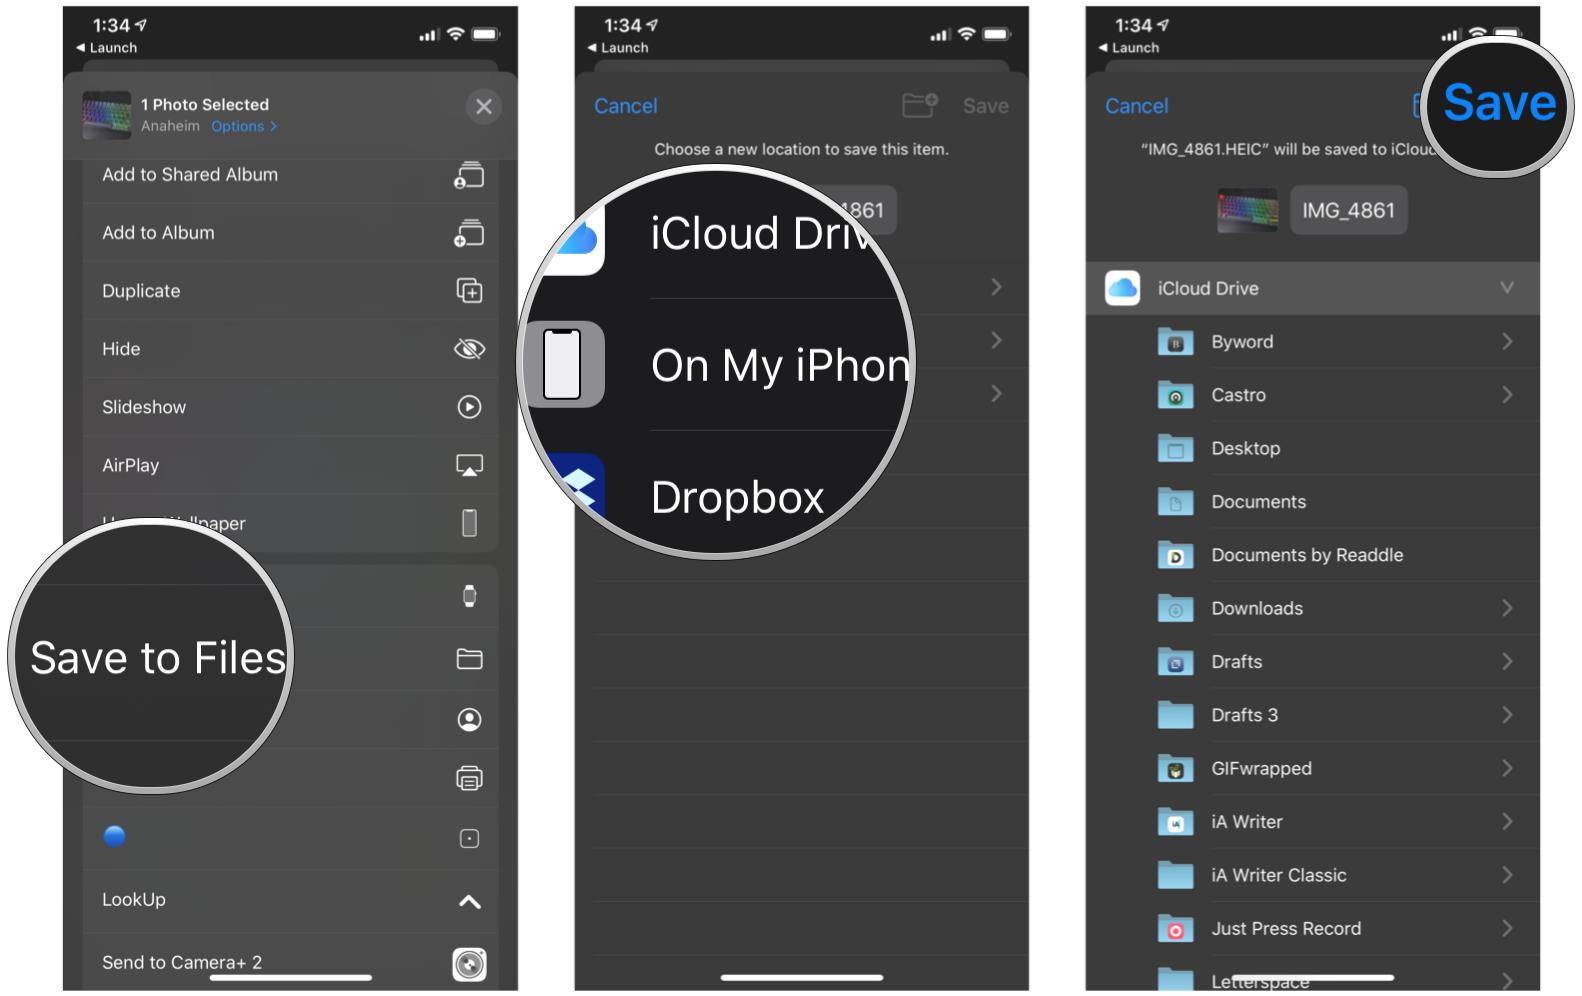
- Scroll down and tap Save to Files.
- If you have multiple locations saved, choose the location you want to save to.
-
Tap Save.
How to view your photo or video in iCloud Drive on your Mac
Once you have imported your photos and video to the Files app in your specified location, it should be easy to find them on your Mac.
- Launch Finder on your Mac.
-
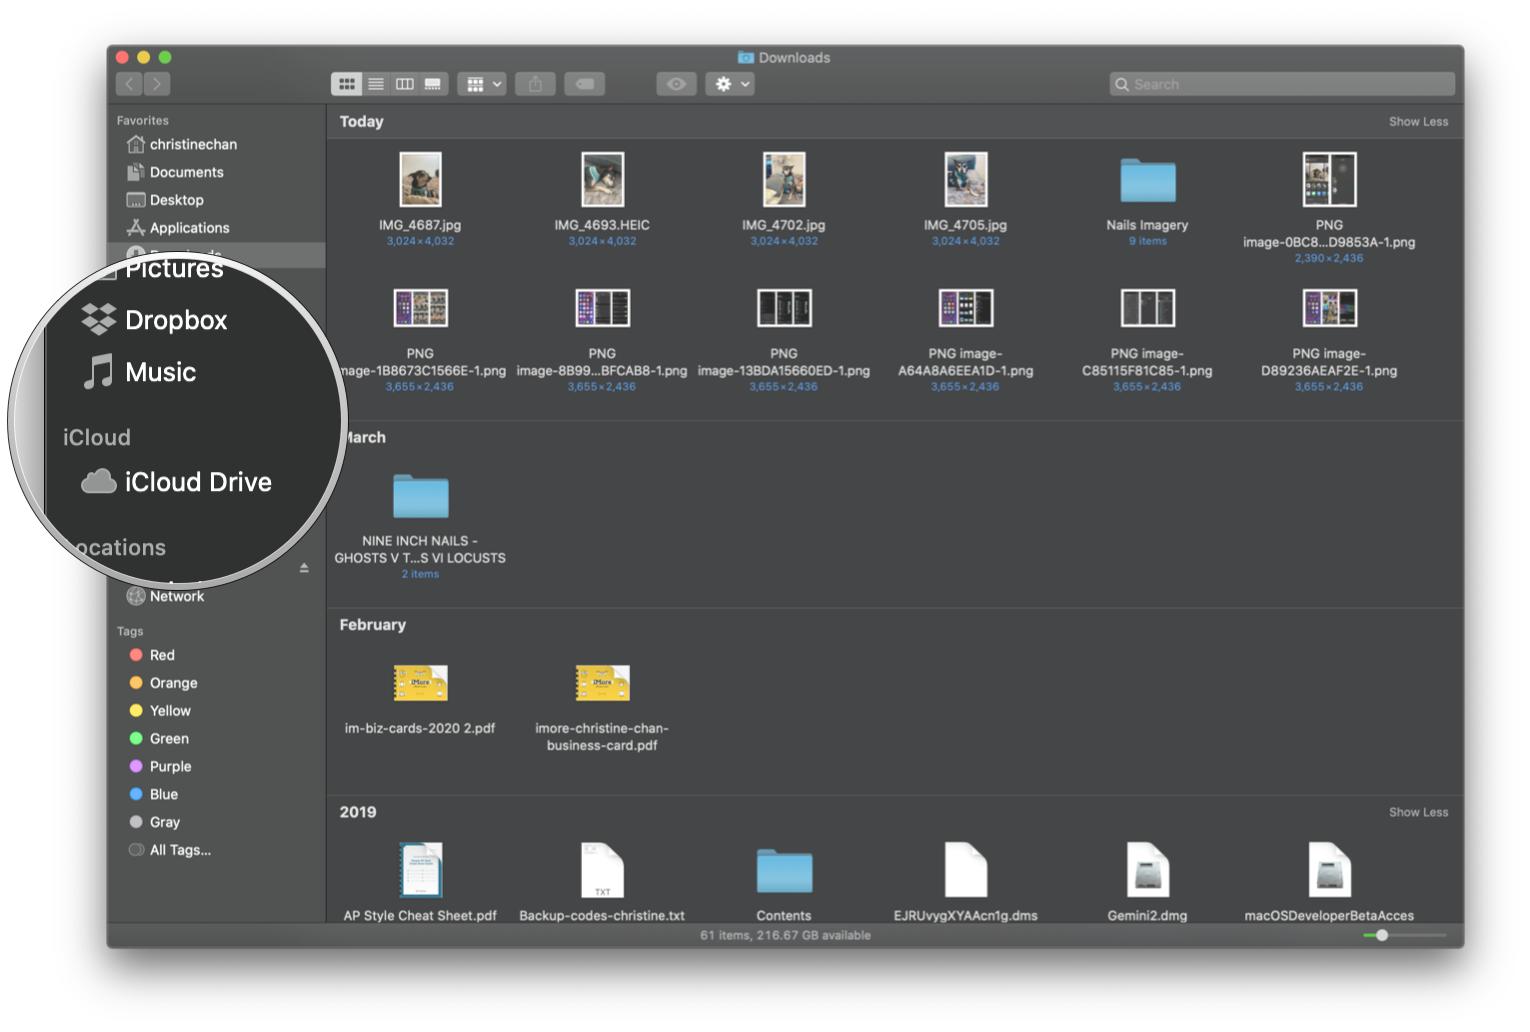
Click iCloud Drive in the sidebar. If you chose a different location, like Dropbox, click Dropbox in the sidebar.
- Your photo or video should be there. It may be easier to sort by Date Added or Date Modified if you have a lot of files.
Questions about how to transfer photos from iPhone to Mac?
These are the best and easiest methods when it comes down to how to transfer photos from your iPhone to your Mac. Do these tips work for you? Or do you have another method that you prefer? Let us know in the comments!
Updated April 2021: These are still the best ways to transfer photos from your iPhone to your Mac.
